最近弄得东西都是实物没什么研究可写,全部就是调试啊调试啊~还是写一点东西吧。
最近做了一个基于51外部扩展RAM的小计算器。
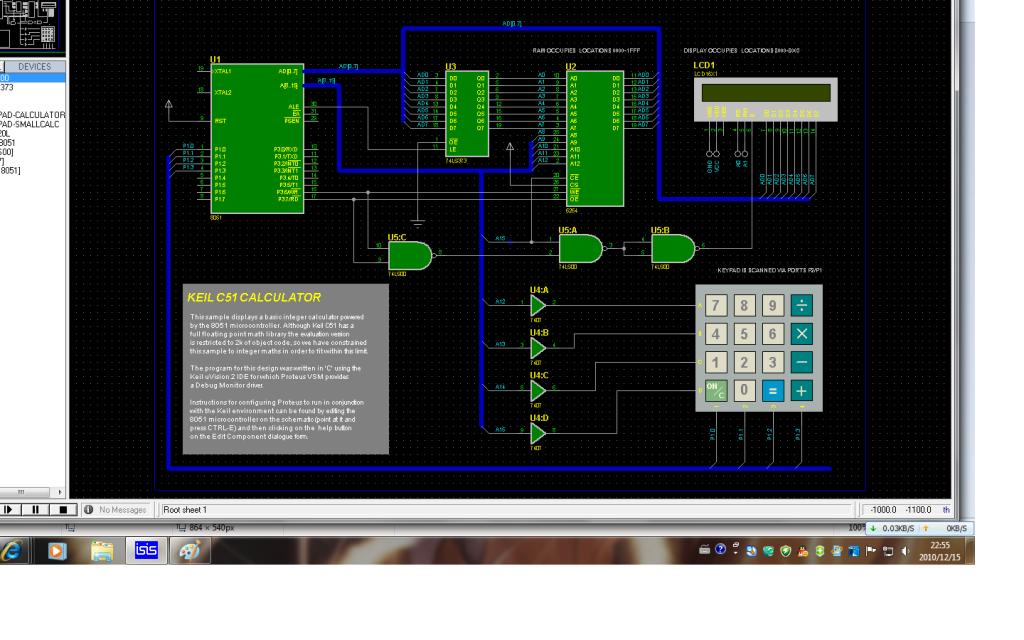
用的是标准的总线结构,锁存器用的74L373,RAM用的是6264,液晶是1602,使能用74LS00来选择。最后用7407作为了
驱动。
本来他们公司给的代码说的是C51,实际上核心的确是C,不过LCD和键盘用的都是汇编。由于正在略微研究下外部扩展就拿来做出来顺便把代码都改成C的。LCD的驱动完全是总线结构,根据硬件连接来写代码。下面把LCD的代码汇编和C都放上来
我把前面汇编的注释掉了~
/******************************************************************************
************ LABCENTER ELECTRONICS ************
************ Proteus VSM Sample Design Code ************
************ Integer Calculator ( 2K Code Limit) ************
********************************************************************************/
/*汇编
NAME LCD
;Set up Code Segment and exports:
LCD SEGMENT CODE
RSEG LCD
PUBLIC _output
PUBLIC initialise
PUBLIC clearscreen
;LCD Register Addresses.
LCD_CMD_WRequ 00h
LCD_DATA_WRequ01h
LCD_BUSY_RDequ02h
LCD_DATA_RDequ03h
LCD_PAGEequ80h
;LCD Commands
LCD_CLSequ1
LCD_HOMEequ2
LCD_SETMODEequ4
LCD_SETVISIBLEequ8
LCD_SHIFTequ16
LCD_SETFUNCTIONequ32
LCD_SETCGADDRequ64
LCD_SETDDADDRequ128
; Initialisation Routine for the LCD display.
initialise: mov A,#030h;1 line, 8 bits
call wrcmd
mov A,#LCD_SETVISIBLE + 4
call wrcmd
mov A,#LCD_SETDDADDR+15; Start at right hand side of the display
call wrcmd
mov A,#LCD_SETMODE + 3; Automatic Increment - Display shift left.
call wrcmd
ret
; We move the parameter (held in R7) into the Accumulator prior to writing it.
_output:mov A,R7
call wrdata
ret
;Clears the LCD display and sets the initialisation conditions.
clearscreen:mov A,#LCD_CLS
call wrcmd
mov A,#LCD_SETDDADDR + 15
call wrcmd
ret
;*****************************
;******** SUBROUTINES ********
;*****************************
;Sub routine to write command:
wrcmd:mov P2,#LCD_PAGE
mov R0,#LCD_CMD_WR
movx @R0,A
jmp wtbusy
; Subroutine to Write a Character to the LCD Display.
wrdata:MOV P2,#LCD_PAGE
MOV R0,#LCD_DATA_WR
MOV A,R7
MOVX @R0,A
; Subroutine to wait for a busy clear.
wtbusy:MOV R1,#LCD_BUSY_RD
MOVX A,@R1
JB ACC.7,wtbusy
ret
END
*/
#ifndef _LCD1602_H_
#define _LCD1602_H_
#include <reg52.h>
#include <intrins.h>
#include <absacc.h>
#define clear 0x01
#define ret 0x02
#define fuction_set_usual 0x38
/********************************显示数据表*********************************/
enum Mode{in_shift,in_nshift,de_shift,de_nshift};
unsigned char Entry_Mode[]={0x07,0x06,0x05,0x04};
// Display_Control 其中几位靠位来吧,比较多,这个命令控制了是否显示,光标是否显示和闪烁功能
// 通用函数
/*********************************端口定义**********************************/
#define LCMDWXBYTE[0x8001]// 数据口
#define LCMCWXBYTE[0x8000]// 命令
#define LCMBY XBYTE[0x8002]
//sbit ep = P2^2;
/********************************显示数据表*********************************/
//00-0h乃是GGRAM自定义库的自建位
unsigned char CGCODE[]={0x08,0x0F,0x12,0x0F,0x0A,0x1F,0x02,0x02,//"年"代码 0x00
0x0F,0x09,0x0F,0x09,0x0F,0x09,0x13,0x00,//"月"代码 0x01
0x0F,0x09,0x09,0x0F,0x09,0x09,0x0F,0x00,//"日"代码 0x02
0x07,0x04,0x07,0x04,0x07,0x00,0x04,0x07,//"星"左上半部分代码 0x03
0x1F,0x01,0x1F,0x01,0x1F,0x08,0x08,0x1F,//"星"右上半部分代码 0x04
0x08,0x17,0x00,0x1F,0x00,0x00,0x00,0x00,//"星"左下半部分代码 0x05
0x08,0x1F,0x08,0x1F,0x00,0x00,0x00,0x00//"星"右下半部分代码 0x06
};
unsigned char tab[]={'1','0',0x00,'0','3',0x01,'0','9',0x02};//显示"08年03月09日"
/*****************************************************************************
函数功能:LCD延时子程序
入口参数:ms
出口参数:
*****************************************************************************/
void delay(unsigned char ms)
{
unsigned char i;
while(ms--)
{
for(i = 0; i< 250; i++)
{
_nop_();
_nop_();
_nop_();
_nop_();
}
}
}
/*****************************************************************************
函数功能:测试LCD忙碌状态
入口参数:
出口参数:result
*****************************************************************************/
bit lcd_bz()
{
bit result;
//ep = 1;
//_nop_();
//_nop_();
//_nop_();
//_nop_();
result = (bit)(LCMBY&0x80);//高1就是D7
//ep=0;
return result;
}
/*****************************************************************************
函数功能:写指令数据到LCD子程序
入口参数:cmd
出口参数:
*****************************************************************************/
void lcd_wcmd(unsigned char cmd)
{
while(lcd_bz());//判断LCD是否忙碌
//ep = 0;
//_nop_();
//_nop_();
LCMCW = cmd;
//_nop_();
//_nop_();
//_nop_();
//_nop_();
//ep = 1;
//_nop_();
//_nop_();
//_nop_();
//_nop_();
//ep = 0;
}
/*****************************************************************************
函数功能:设定显示位置子程序
入口参数:pos
出口参数:
*****************************************************************************/
void lcd_pos(unsigned char pos)
{
lcd_wcmd(pos | 0x80);
}
/*****************************************************************************
函数功能:写入显示数据到LCD子程序
入口参数:dat
出口参数:
*****************************************************************************/
void lcd_wdat(unsigned char dat)
{
while(lcd_bz());//判断LCD是否忙碌
//ep = 0;
LCMDW = dat;
//_nop_();
//_nop_();
//_nop_();
//_nop_();
//ep = 1;
//_nop_();
//_nop_();
//_nop_();
//_nop_();
//ep = 0;
}
/*****************************************************************************
函数功能:LCD初始化子程序
写指令38H:显示模式设置
写指令08H:显示关闭
写指令01H:显示清屏
写指令06H:显示光标移动设置
写指令0CH:显示开及光标设置
入口参数:
出口参数:
*****************************************************************************/
void lcd_init()
{
lcd_wcmd(0x38);
delay(1);
lcd_wcmd(0x0c);
delay(1);
lcd_wcmd(0x06);
delay(1);
lcd_wcmd(0x01);
delay(1);
}
/*****************************************************************************
函数功能:画图
入口参数:
出口参数:
*****************************************************************************/
void draw()
{
int i;
lcd_init();
delay(10) ;
lcd_wcmd(0x40);//将自定义字符写入CGRAM
for(i=0;i<56;i++)//循环56次写入
{
lcd_wdat(CGCODE[i]);
}
lcd_wcmd(0x80);//写入初始地址
for(i=0;i<9;i++)
{
lcd_wdat(tab[i]);
}
}
#endif
详细看代码就可以了,其中汇编的关键在MOVX的使用上,时序图可以查的到,可以研究一下~其中把LCD的地址当做寄存器来看待
每次先选好使用再给数据,就可行了~
主要说C
首先说明~C语言是我从以前的非总线式结构里面改写的。因此有些函数没有用到。
C语言的关键在这里就是
#define LCMDW XBYTE[0x8001] // 数据口
#define LCMCW XBYTE[0x8000] // 命令
#define LCMBY XBYTE[0x8002] //忙检测
XBYTE是在absacc.h库里的一个定义地址的工具
其中有~#define XBYTE ((unsigned char volatile xdata *) 0)
其中根据硬件连接高2位的使能打开正是80H的地址,低2位的地址根据功能(A0,A1)定义不同的地址
然后在输出的时候协商
LCMDW=*****;就可以实现MOVX的功能了,产生外部存储的时序来啦~
液晶怎么使用就看数据手册吧,1602的手册可是很全很很全,网上的例子更是很多很多(把上面代码稍微改动就可以直接使用lcd了哈)
接下来给出SAMPLE里我一点没动的核心,计算器的算法实现
/******************************************************************************
************ LABCENTER ELECTRONICS ************
************ Proteus VSM Sample Design Code ************
************ Integer Calculator ( 2K Code Limit) ************
********************************************************************************/
/*汇编
NAME LCD
;Set up Code Segment and exports:
LCD SEGMENT CODE
RSEG LCD
PUBLIC _output
PUBLIC initialise
PUBLIC clearscreen
;LCD Register Addresses.
LCD_CMD_WRequ 00h
LCD_DATA_WRequ01h
LCD_BUSY_RDequ02h
LCD_DATA_RDequ03h
LCD_PAGEequ80h
;LCD Commands
LCD_CLSequ1
LCD_HOMEequ2
LCD_SETMODEequ4
LCD_SETVISIBLEequ8
LCD_SHIFTequ16
LCD_SETFUNCTIONequ32
LCD_SETCGADDRequ64
LCD_SETDDADDRequ128
; Initialisation Routine for the LCD display.
initialise: mov A,#030h;1 line, 8 bits
call wrcmd
mov A,#LCD_SETVISIBLE + 4
call wrcmd
mov A,#LCD_SETDDADDR+15; Start at right hand side of the display
call wrcmd
mov A,#LCD_SETMODE + 3; Automatic Increment - Display shift left.
call wrcmd
ret
; We move the parameter (held in R7) into the Accumulator prior to writing it.
_output:mov A,R7
call wrdata
ret
;Clears the LCD display and sets the initialisation conditions.
clearscreen:mov A,#LCD_CLS
call wrcmd
mov A,#LCD_SETDDADDR + 15
call wrcmd
ret
;*****************************
;******** SUBROUTINES ********
;*****************************
;Sub routine to write command:
wrcmd:mov P2,#LCD_PAGE
mov R0,#LCD_CMD_WR
movx @R0,A
jmp wtbusy
; Subroutine to Write a Character to the LCD Display.
wrdata:MOV P2,#LCD_PAGE
MOV R0,#LCD_DATA_WR
MOV A,R7
MOVX @R0,A
; Subroutine to wait for a busy clear.
wtbusy:MOV R1,#LCD_BUSY_RD
MOVX A,@R1
JB ACC.7,wtbusy
ret
END
*/
#ifndef _LCD1602_H_
#define _LCD1602_H_
#include <reg52.h>
#include <intrins.h>
#include <absacc.h>
#define clear 0x01
#define ret 0x02
#define fuction_set_usual 0x38
/********************************显示数据表*********************************/
enum Mode{in_shift,in_nshift,de_shift,de_nshift};
unsigned char Entry_Mode[]={0x07,0x06,0x05,0x04};
// Display_Control 其中几位靠位来吧,比较多,这个命令控制了是否显示,光标是否显示和闪烁功能
// 通用函数
/*********************************端口定义**********************************/
#define LCMDWXBYTE[0x8001]// 数据口
#define LCMCWXBYTE[0x8000]// 命令
#define LCMBY XBYTE[0x8002]
//sbit ep = P2^2;
/********************************显示数据表*********************************/
//00-0h乃是GGRAM自定义库的自建位
unsigned char CGCODE[]={0x08,0x0F,0x12,0x0F,0x0A,0x1F,0x02,0x02,//"年"代码 0x00
0x0F,0x09,0x0F,0x09,0x0F,0x09,0x13,0x00,//"月"代码 0x01
0x0F,0x09,0x09,0x0F,0x09,0x09,0x0F,0x00,//"日"代码 0x02
0x07,0x04,0x07,0x04,0x07,0x00,0x04,0x07,//"星"左上半部分代码 0x03
0x1F,0x01,0x1F,0x01,0x1F,0x08,0x08,0x1F,//"星"右上半部分代码 0x04
0x08,0x17,0x00,0x1F,0x00,0x00,0x00,0x00,//"星"左下半部分代码 0x05
0x08,0x1F,0x08,0x1F,0x00,0x00,0x00,0x00//"星"右下半部分代码 0x06
};
unsigned char tab[]={'1','0',0x00,'0','3',0x01,'0','9',0x02};//显示"08年03月09日"
/*****************************************************************************
函数功能:LCD延时子程序
入口参数:ms
出口参数:
*****************************************************************************/
void delay(unsigned char ms)
{
unsigned char i;
while(ms--)
{
for(i = 0; i< 250; i++)
{
_nop_();
_nop_();
_nop_();
_nop_();
}
}
}
/*****************************************************************************
函数功能:测试LCD忙碌状态
入口参数:
出口参数:result
*****************************************************************************/
bit lcd_bz()
{
bit result;
//ep = 1;
//_nop_();
//_nop_();
//_nop_();
//_nop_();
result = (bit)(LCMBY&0x80);//高1就是D7
//ep=0;
return result;
}
/*****************************************************************************
函数功能:写指令数据到LCD子程序
入口参数:cmd
出口参数:
*****************************************************************************/
void lcd_wcmd(unsigned char cmd)
{
while(lcd_bz());//判断LCD是否忙碌
//ep = 0;
//_nop_();
//_nop_();
LCMCW = cmd;
//_nop_();
//_nop_();
//_nop_();
//_nop_();
//ep = 1;
//_nop_();
//_nop_();
//_nop_();
//_nop_();
//ep = 0;
}
/*****************************************************************************
函数功能:设定显示位置子程序
入口参数:pos
出口参数:
*****************************************************************************/
void lcd_pos(unsigned char pos)
{
lcd_wcmd(pos | 0x80);
}
/*****************************************************************************
函数功能:写入显示数据到LCD子程序
入口参数:dat
出口参数:
*****************************************************************************/
void lcd_wdat(unsigned char dat)
{
while(lcd_bz());//判断LCD是否忙碌
//ep = 0;
LCMDW = dat;
//_nop_();
//_nop_();
//_nop_();
//_nop_();
//ep = 1;
//_nop_();
//_nop_();
//_nop_();
//_nop_();
//ep = 0;
}
/*****************************************************************************
函数功能:LCD初始化子程序
写指令38H:显示模式设置
写指令08H:显示关闭
写指令01H:显示清屏
写指令06H:显示光标移动设置
写指令0CH:显示开及光标设置
入口参数:
出口参数:
*****************************************************************************/
void lcd_init()
{
lcd_wcmd(0x30);
delay(1);
lcd_wcmd(0x0c);
delay(1);
lcd_wcmd(0x06);//此处最好用07调节成右侧显示模式。仿真时用07不出现。故用06
delay(1);
lcd_wcmd(0x01);
delay(1);
lcd_wcmd(0x8f); //设置位置,上面汇编转过来的
delay(1);
}
/*****************************************************************************
函数功能:画图
入口参数:
出口参数:
*****************************************************************************/
void draw()
{
int i;
lcd_init();
delay(10) ;
lcd_wcmd(0x40);//将自定义字符写入CGRAM
for(i=0;i<56;i++)//循环56次写入
{
lcd_wdat(CGCODE[i]);
}
lcd_wcmd(0x80);//写入初始地址
for(i=0;i<9;i++)
{
lcd_wdat(tab[i]);
}
}
#endif
这个由于里面的注释很详细,我也稍微加了一两句,就不做解释了,懒人~不过其中有个设定从右侧开始的。。我设定竟然不好用
当然了,从右侧自然好看~从左侧是可以用的呵呵(我已经写在注释里面啦~)。很怀疑软件有点不太支持哈~
最后是键盘的扫描,对于这个东西,用汇编实在是蛮痛苦的。呵呵~不过就像学长说过,用习惯了都是一样的!
同样前面的汇编注释掉了
/******************************************************************************
************ LABCENTER ELECTRONICS ************
************ Proteus VSM Sample Design Code ************
************ Integer Calculator ( 2K Code Limit) ************
********************************************************************************/
/*汇编
NAME LCD
;Set up Code Segment and exports:
LCD SEGMENT CODE
RSEG LCD
PUBLIC _output
PUBLIC initialise
PUBLIC clearscreen
;LCD Register Addresses.
LCD_CMD_WRequ 00h
LCD_DATA_WRequ01h
LCD_BUSY_RDequ02h
LCD_DATA_RDequ03h
LCD_PAGEequ80h
;LCD Commands
LCD_CLSequ1
LCD_HOMEequ2
LCD_SETMODEequ4
LCD_SETVISIBLEequ8
LCD_SHIFTequ16
LCD_SETFUNCTIONequ32
LCD_SETCGADDRequ64
LCD_SETDDADDRequ128
; Initialisation Routine for the LCD display.
initialise: mov A,#030h;1 line, 8 bits
call wrcmd
mov A,#LCD_SETVISIBLE + 4
call wrcmd
mov A,#LCD_SETDDADDR+15; Start at right hand side of the display
call wrcmd
mov A,#LCD_SETMODE + 3; Automatic Increment - Display shift left.
call wrcmd
ret
; We move the parameter (held in R7) into the Accumulator prior to writing it.
_output:mov A,R7
call wrdata
ret
;Clears the LCD display and sets the initialisation conditions.
clearscreen:mov A,#LCD_CLS
call wrcmd
mov A,#LCD_SETDDADDR + 15
call wrcmd
ret
;*****************************
;******** SUBROUTINES ********
;*****************************
;Sub routine to write command:
wrcmd:mov P2,#LCD_PAGE
mov R0,#LCD_CMD_WR
movx @R0,A
jmp wtbusy
; Subroutine to Write a Character to the LCD Display.
wrdata:MOV P2,#LCD_PAGE
MOV R0,#LCD_DATA_WR
MOV A,R7
MOVX @R0,A
; Subroutine to wait for a busy clear.
wtbusy:MOV R1,#LCD_BUSY_RD
MOVX A,@R1
JB ACC.7,wtbusy
ret
END
*/
#ifndef _LCD1602_H_
#define _LCD1602_H_
#include <reg52.h>
#include <intrins.h>
#include <absacc.h>
#define clear 0x01
#define ret 0x02
#define fuction_set_usual 0x38
/********************************显示数据表*********************************/
enum Mode{in_shift,in_nshift,de_shift,de_nshift};
unsigned char Entry_Mode[]={0x07,0x06,0x05,0x04};
// Display_Control 其中几位靠位来吧,比较多,这个命令控制了是否显示,光标是否显示和闪烁功能
// 通用函数
/*********************************端口定义**********************************/
#define LCMDWXBYTE[0x8001]// 数据口
#define LCMCWXBYTE[0x8000]// 命令
#define LCMBY XBYTE[0x8002]
//sbit ep = P2^2;
/********************************显示数据表*********************************/
//00-0h乃是GGRAM自定义库的自建位
unsigned char CGCODE[]={0x08,0x0F,0x12,0x0F,0x0A,0x1F,0x02,0x02,//"年"代码 0x00
0x0F,0x09,0x0F,0x09,0x0F,0x09,0x13,0x00,//"月"代码 0x01
0x0F,0x09,0x09,0x0F,0x09,0x09,0x0F,0x00,//"日"代码 0x02
0x07,0x04,0x07,0x04,0x07,0x00,0x04,0x07,//"星"左上半部分代码 0x03
0x1F,0x01,0x1F,0x01,0x1F,0x08,0x08,0x1F,//"星"右上半部分代码 0x04
0x08,0x17,0x00,0x1F,0x00,0x00,0x00,0x00,//"星"左下半部分代码 0x05
0x08,0x1F,0x08,0x1F,0x00,0x00,0x00,0x00//"星"右下半部分代码 0x06
};
unsigned char tab[]={'1','0',0x00,'0','3',0x01,'0','9',0x02};//显示"08年03月09日"
/*****************************************************************************
函数功能:LCD延时子程序
入口参数:ms
出口参数:
*****************************************************************************/
void delay(unsigned char ms)
{
unsigned char i;
while(ms--)
{
for(i = 0; i< 250; i++)
{
_nop_();
_nop_();
_nop_();
_nop_();
}
}
}
/*****************************************************************************
函数功能:测试LCD忙碌状态
入口参数:
出口参数:result
*****************************************************************************/
bit lcd_bz()
{
bit result;
//ep = 1;
//_nop_();
//_nop_();
//_nop_();
//_nop_();
result = (bit)(LCMBY&0x80);//高1就是D7
//ep=0;
return result;
}
/*****************************************************************************
函数功能:写指令数据到LCD子程序
入口参数:cmd
出口参数:
*****************************************************************************/
void lcd_wcmd(unsigned char cmd)
{
while(lcd_bz());//判断LCD是否忙碌
//ep = 0;
//_nop_();
//_nop_();
LCMCW = cmd;
//_nop_();
//_nop_();
//_nop_();
//_nop_();
//ep = 1;
//_nop_();
//_nop_();
//_nop_();
//_nop_();
//ep = 0;
}
/*****************************************************************************
函数功能:设定显示位置子程序
入口参数:pos
出口参数:
*****************************************************************************/
void lcd_pos(unsigned char pos)
{
lcd_wcmd(pos | 0x80);
}
/*****************************************************************************
函数功能:写入显示数据到LCD子程序
入口参数:dat
出口参数:
*****************************************************************************/
void lcd_wdat(unsigned char dat)
{
while(lcd_bz());//判断LCD是否忙碌
//ep = 0;
LCMDW = dat;
//_nop_();
//_nop_();
//_nop_();
//_nop_();
//ep = 1;
//_nop_();
//_nop_();
//_nop_();
//_nop_();
//ep = 0;
}
/*****************************************************************************
函数功能:LCD初始化子程序
写指令38H:显示模式设置
写指令08H:显示关闭
写指令01H:显示清屏
写指令06H:显示光标移动设置
写指令0CH:显示开及光标设置
入口参数:
出口参数:
*****************************************************************************/
void lcd_init()
{
lcd_wcmd(0x30);
delay(1);
lcd_wcmd(0x0c);
delay(1);
lcd_wcmd(0x06);//此处最好用07调节成右侧显示模式。仿真时用07不出现。故用06
delay(1);
lcd_wcmd(0x01);
delay(1);
lcd_wcmd(0x8f); //设置位置,上面汇编转过来的
delay(1);
}
/*****************************************************************************
函数功能:画图
入口参数:
出口参数:
*****************************************************************************/
void draw()
{
int i;
lcd_init();
delay(10) ;
lcd_wcmd(0x40);//将自定义字符写入CGRAM for(i=0;i<56;i++)//循环56次写入
{
lcd_wdat(CGCODE[i]);
}
lcd_wcmd(0x80);//写入初始地址
for(i=0;i<9;i++)
{
lcd_wdat(tab[i]);
}
}
#endif
键盘的扫描实现~没有用上拉下拉电阻~建议使用上拉下拉的电阻。做实物时总是不一样的,比如P0口总线可以不上拉
不过事实说,自己做的时候不上拉是很不好用的~没办法,自己做的工艺太差啦。
好了~大概就是这么多。计划下一个是以前的一个小超声波东东。串口只能再等等啦,虽然很是重要的东西。
 畅学电子
畅学电子
