正如其他网友所感概的,NXP比较节俭!确实,NXP不管推广还是公关,都一贯的践行简约,这回的LPC800-Mini-Kit也是个好例子,简单得一塌糊涂,你让友商们情何以堪?!我拿到板子拆开一看,心说“C,还有这种评估板,没调试器,没说明书,没连接线,你要大伙怎么用?!”那个“简易性设计挑战”还要大家上传视频,那至少也得给大伙儿发个摄像头啊^_^,还有那奖品,这么大的公司怎么好意思拿出手啊,亲!不就是想利用大伙儿的力量快速、低成本地丰富应用文档吗,其用心良苦可昭日月,不过把大家的劳动力价值看得太低了!!
不晓得当时哪只鬼迷了我嘞个的心窍,竟然被诱申请了块LPC800-Mini-Kit,历时1月有余才在有些淡忘的时候收到板子!拿人东西尽量替人办事^_^,言归正经,这些天抽空捣鼓了下这块板子,将一些试验过程分享出来,希望对大家有些许参考。为了贯彻NXP的颇有中华美德的精神,我下面的内容也尽量简约,大家还是多亲自动手的好。
LPC-Link取自LPCXpresso LPC1114评估板,LPC800-Mini-Kit,1根USB 2.0 A/Mini-B线缆,1只LED,1只电阻,若干导线,1台PC。
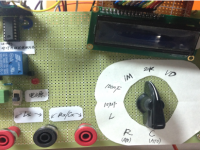
1.因为Kit板载的LPC810只有6个非电源管脚,调试下载程序占去至少3个引脚(其中1个引脚是连着板载的贴片LED1),所以只好另外接个插件的LED在旁边的扩展区进行测试,当然需要串个小的限流电阻。实际上用在线仿真功能的调试意义不大了,因为GPIO口是复用的,此处主要是为了演示如何下载程序。再找人要一块LPCXpresso LPC1114 RevA评估板,将连接LPC1114调试接口的几个0欧电阻断开,然后用导线连接LPC-Link和LPC810的SWD接口。总共5根线,其中2两根电源线,剩下3根是SWDIO、SWCLK、RESET。连接原理和实物如下图所示。注意,Kit上电源连线我是直接接到单片机管脚,因为它前面有一个稳压电路,LPC1114评估板上那几个0欧电阻断开后,通电时LPC1114目标板仍会运行,但不影响本试验操作。
2.安装LPCXpresso v5.2.6_2137,这是目前的最新版本,典型安装就行。需要邮箱进行注册,还不算太繁琐。推荐阅读“Getting started with NXPLPCXpresso Rev.12”。
4.从官网下载例程LPC800 LPCXpresso Examples V1.03_1.zip,运行LPCXpresso导入项目。操作方法参考其它资料,同样推荐阅读“Getting started with NXPLPCXpresso Rev.12”。注意这些例程是针对LPC812的,或者就是针对LPCXpresso LPC800评估板的,所以不能拿来就用。我将其中的Blinky项目的主文件作了修改,代码如下(代码仅仅是为了让LPC810跑起来,代码质量暂不考虑):
-
/****************************************************************************
* $Id:: blinky.c 3634 2012-10-31 00:09:55Z usb00423 $
* Project: NXP LPC8xx Blinky example
*
* Description:
* This file contains LED blink code example which include timer,
* GPIO initialization, and clock monitoring.
*
* 部分代码参考了周立功网站下载的例程
****************************************************************************
* Software that is described herein is for illustrative purposes only
* which provides customers with programming information regarding the
* products. This software is supplied "AS IS" without any warranties.
* NXP Semiconductors assumes no responsibility or liability for the
* use of the software, conveys no license or title under any patent,
* copyright, or mask work right to the product. NXP Semiconductors
* reserves the right to make changes in the software without
* notification. NXP Semiconductors also make no representation or
* warranty that such application will be suitable for the specified
* use without further testing or modification.
* Permission to use, copy, modify, and distribute this software and its
* documentation is hereby granted, under NXP Semiconductors'
* relevant copyright in the software, without fee, provided that it
* is used in conjunction with NXP Semiconductors microcontrollers. This
* copyright, permission, and disclaimer notice must appear in all copies of
* this code.
****************************************************************************/
#ifdef __USE_CMSIS
#include "LPC8xx.h"
#endif
#include "lpc8xx_clkconfig.h"
#include "lpc8xx_gpio.h"
#include "lpc8xx_mrt.h"
extern uint32_t mrt_counter;
/*********************************************************************************************************
** Function name: myDelay
** 周立功的例程
** Descriptions: 软件延时
** input parameters: ulTime:延时时间(ms)
** output parameters: 无
** Returned value: 无
*********************************************************************************************************/
void myDelay (uint32_t ulTime)
{
uint32_t i;
while (ulTime--) {
for (i = 0; i < 2401; i++);
}
}
/* Main Program */
int main (void) {
//uint32_t regVal;
//SystemInit();
SystemCoreClockUpdate();
//CLKOUT_Setup( CLKOUTCLK_SRC_IRC_OSC );
/* Enable AHB clock to the GPIO domain. */
LPC_SYSCON->SYSAHBCLKCTRL |= (1<<6);
//GPIOInit();
/* Set port p0.7 to output */
GPIOSetDir( PORT0, 4, 1 );
//GPIOSetDir( PORT0, 2, 1 );
/* Set port p0.16 to output */
//GPIOSetDir( 0, 16, 1 );
/* Set port p0.17 to output */
//GPIOSetDir( 0, 17, 1 );
myDelay(200);
//init_mrt(0x500);
while (1) /* Loop forever */
{
/* I/O configuration and LED setting pending. */
/*if ( (mrt_counter > 0) && (mrt_counter <= 1000) )
{
GPIOSetBitValue( PORT0, 2, 0 );
}
if ( (mrt_counter > 1000) && (mrt_counter <= 2000) )
{
GPIOSetBitValue( PORT0, 2, 1 );
}
if ( (mrt_counter > 400) && (mrt_counter <= 600) )
{
GPIOSetBitValue( 0, 16, 0 );
}
if ( (mrt_counter > 600) && (mrt_counter <= 800) )
{
GPIOSetBitValue( 0, 16, 1 );
}
if ( (mrt_counter > 800) && (mrt_counter <= 1000) )
{
GPIOSetBitValue( 0, 17, 0 );
}
if ( (mrt_counter > 1000) && (mrt_counter <= 1200) )
{
GPIOSetBitValue( 0, 17, 1 );
}
else if ( mrt_counter > 400 )
{
mrt_counter = 0;
}*/
GPIOSetBitValue( PORT0, 4, 0 );
//GPIOSetBitValue( PORT0, 2, 1 );
myDelay(150);
GPIOSetBitValue( PORT0, 4, 1 );
//GPIOSetBitValue( PORT0, 2, 0 );
myDelay(100);
}
}
5.打开项目的properties,左侧在C/C++ Build项下选择MCU settings,然后在右侧的Target框内选中LPC8xx下的LPC810,再然后OK。编译本项目。应该能通过,要是不通过,请自行查找原因J..。
6.进行下载或者调试,这个操作方法同样无需我在这里赘述了。注意,下载或调试前,先按住Kit上的ISP键,然后再按一下RESET键,然后松开按键,好似这样才能进行程序下载和调试。PC上第一次使用LPC-Link的话,开始下载程序时,好像还会再经历一次安装驱动的过程,也是自动搜索驱动就行。这个跟一开始电脑插上LPCXpresso LPC1114评估板时安装驱动过程不一样,那个在没安装LPCXpresso开发环境时就会安装一次驱动。如果只是使用下载工具,下载的目标文件在项目文件夹下Debug文件夹里的.axf文件。是进入调试过程或者烧录完程序后,各自发挥吧。下面是运行效果图。